InTouch 2012 R2 (10.6) Classic Install Guide
| |

| INSTALLATION GUIDE |
Description
Step by step installation of Wonderware's InTouch software version 10.6.
| Author | Jimmy McGlaughlin |
| Publish Date | 01/14//2014 |
| Applies to Software | InTouch Classic |
| Applies to Version | 10.6 |
| Applies to System/Module | n/a |
| Article Version | 01.01.01 |
************************************************************************************************************************************************************
Pre-Requisites
Important!
FactorySuite Gateway (FS Gateway) 3.0 is installed as a hidden feature of InTouch HMI 2012 R2 (v10.6) in an ArchestrA System Platform 2012 R2 installation.
- If you originally installed FS Gateway 2.0 SP1 without any other InTouch products, then upgrading ArchestrA System Platform 2012 to ArchestrA System Platform 2012 R2 will upgrade FSGateway to version 3.0.
- If you originally installed FS Gateway 2.0 SP1 as part of ArchestrA System Platform 2012 with InTouch 10.5, you must uninstall FS Gateway before upgrading ASP 2012 to R2.
System Requirements
Hardware Requirements by Installation Size
The following table lists the hardware requirements for the ArchestrA System Platform 2012 R2 software based on the size of the installation.
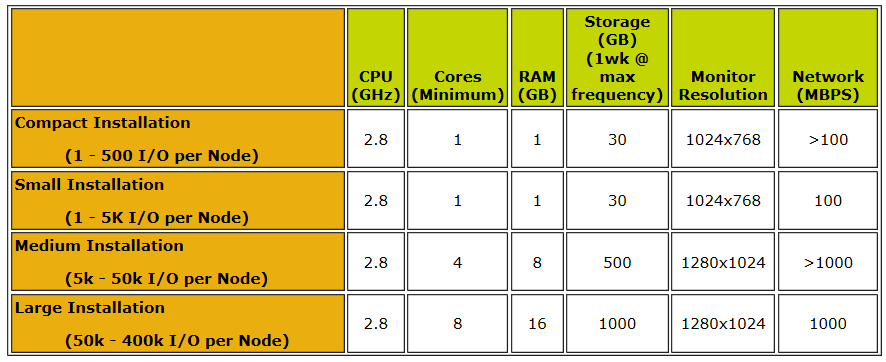
Hardware Requirements Notes:
- Windows 7 and Windows Server 2008 R2 operating systems and SQL Server versions impose hardware requirements that may exceed the minimum requirements for Wonderware Application Server 2012 R2 (v3.6). If you intend to install ArchestrA System Platform 2012 R2 on a computer running Windows 7, Windows Server 2008 R2, or supported SQL Server versions, see the following Microsoft Web sites for hardware requirements:
- www.microsoft.com/windowsserver2008/en/us/system-requirements.aspx
- www.microsoft.com/windows/windows-7/get/system-requirements.aspx
- msdn.microsoft.com/en-us/library/ms143506.aspx#EE32
- See the following section for specific auxiliary hardware requirements.
Auxiliary Hardware Requirements
Alternative Authentication Using Smart Cards
- Smart Card: Raak Technologies C2-40 Mini Driver Smart Card
- Smart Card Reader: OK 3021 USB Smart Card Readers
Using Multiple Network Interface Cards
If you are using multiple network interface cards (NICs), you must configure certain settings for the firewall or else a remote node cannot connect to the Galaxy Repository node.
A connection is a term used to define a network interface card (NIC), its settings and the settings of whatever the NIC is connected to. Under certain circumstances, the connection on your computer can change if, for example, the IP address on your network card changes. Your computer's connection can be affected by external factors. During computer startup, and each time a connection changes, the operating system goes through an "Identifying" process to determine which profile should be assigned to the connection.
A profile is a collection of firewall settings that can be applied to a connection. There are three profiles currently defined in the operating system: Domain, Public, and Private.
- The Domain profile is active only when the computer can authenticate with a domain controller on all active interfaces such as LAN, wireless, and VPN. The domain profile may be more or less restrictive than the other two profiles depending on network security policies.
- The Private profile is active whenever the network type for all active network connections on the computer are identified as private networks. The private profile typically is used in a more trusted environment and is less restrictive than the public profile to allow for network discovery.
- The Public profile is active in all other circumstances. The public profile typically is more restrictive than the private profile because the computer often is connected to the Internet in an insecure location. Network discovery and remote access are disabled rather than explicitly blocking specific traffic. Firewall exceptions and rules can be created on any or all of these profiles.
This is important because the OS Configuration utility and the Firewall utility apply their firewall exceptions to the Domain and Private profiles only.
As previously noted, you can specify which profile you want assigned to a connection as long as that connection is not a Domain connection. This is done through the "Network and Sharing Center". Click the Network icon located on the right side of the task bar and then click one of the networks that are shown. You can change a connection from a Public profile to a Private profile. The firewall calls these settings "Profiles" but the network calls them "Location types."
On computers using dual NICs, the first NIC is normally connected to the domain and is assigned the Domain profile automatically. Windows typically assigns the second NIC the Public profile.
The first issue is that your entire computer (all connections) is restricted to the most restrictive of the profiles assigned to any connection. So if the second connection was assigned a profile of Public, none of the firewall exceptions set by the OS Configuration or Firewall utilities will be allowed. The exceptions were set for Domain and Private only, not Public. You must set the second connection to the Private profile for any of the firewall exceptions to work. You want the active profile on the message exchange (MX) NIC to be the profile opened by OS Configuration.
The second issue is that it appears that a restart of your computer, or even a restart of a computer to which you are connected, can change your connection back to the Public profile. Once again the firewall exceptions will not be effective. You'll have to change the connection back to the Private profile after each restart or a restart of the connected computer.
To avoid these NIC issues and prevent the “Identifying” process from taking place on a connection and changing the assigned profile, certain items must be present in the definition of the connection. Follow these rules and procedures:
- If you have only one NIC, no action is required. The profiles and firewall rules are automatic.
- To configure two NICs, do the following:
- If the second NIC is not physically connected to anything (that means no wire in it), no action is required. The profiles and firewall rules are automatic.
- If the second NIC is connected, it MUST be configured. Follow the rules for configuring a normal redundancy setup provided in the Wonderware Application Server User's Guide and the accompanying online help.
- Assign the NIC an IP address, subnet mask and gateway address. Typically, these addresses are internal, non-routable addresses. For example, 192.168.1.xx and 10.x.x.x are common addresses of this type.
- A NIC acting as Redundancy Message Channel (RMC) does not require a default gateway. Otherwise, the gateway can be the same as the IP address. Vista and Windows Server 2008 will identify this NIC and assign it a Private profile.
If you do not configure the second NIC, Vista and Windows Server 2008 will assign a profile of Public to this NIC and cause all of the Wonderware product firewall exceptions to be deactivated on all NICs.
- Set a security policy so that Windows Vista and Windows Server 2008 do not re-set the RMC NIC to a Public profile on rebooting the system or changing the IP address. To make the Private profile setting persistent, do the following:
- On the Windows Start menu, click Run.
- Enter and run this command: SECPOL.MSC. The Local Security Settings menu appears.
- Select Network List Manager Policies on the menu tree.
- Select Unidentified Network from the Network Names displayed.Right-click, then select Properties, and then change the Location type from Not configured to Private.
- Exit the menu and return to Windows.
- If you have more than two NICs, make sure all connected NICs are configured with an IP address.
Operating System, .NET Framework, and Virtualization Requirements
Summary of Requirements for ArchestrA System Platform 2012 R2
The following table lists the operating system, .NET Framework, and virtualization requirements for ArchestrA System Platform 2012 R2.
Note: Only those Windows and SQL versions and service packs shown in the following tables are supported for ArchestrA System Platform 2012 R2 components.
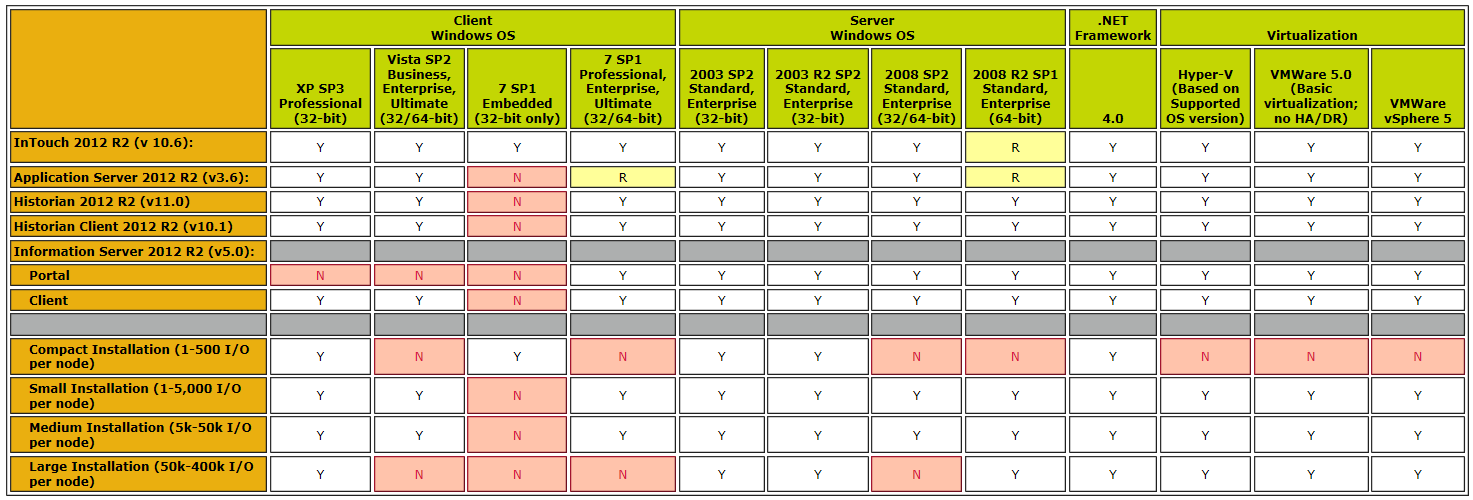
| Supported | Y |
| Supported and Recommended | R |
| Not Supported | N |
Notes:
- The entry for Application Server applies to the ArchestrA IDE (Development Node) and ArchestrA Run time (Application Node).
- The Galaxy Repository (GR Node) can run on a client Windows operating system only in a single-node scenario.
- Development and application nodes are considered to be clients of the server GR node.
- Other .NET Framework versions can coexist, but all scripts in objects run in .NET Framework 4.0. For more information about .NET Framework requirements and compatibility, see .NET Framework Requirements and Compatibility
Operating System Notes Common to Wonderware Products
ActiveX Controls Behavior on Windows 7 and Windows 2008 R2 Operating Systems
Due to the Data Execution Prevention (DEP) feature of Windows 7 or Windows 2008 R2 operating systems, any ActiveX control built with ATL version 7.1 or earlier will fail to host or will have unpredictable behaviors in InTouch 10.6 either in WindowMaker or WindowViewer running on Windows 7 or Windows 2008 R2. For more information, contact Wonderware Technical Support.
Configuring Remote Alarm Retrieval Queries When Running Windows Vista, Windows 7, or Windows Server 2008 R2
The process to configure remote alarm retrieval queries has changed for interactive applications such as InTouch HMI when running on Windows Vista, Windows 7, and Windows Server 2008 R2.
When InTouch WindowViewer is started and generates alarms from an interactive Windows Vista, Windows 7, or Windows Server 2008 R2 desktop session, an AlarmViewer control (running within InTouch HMI) on a remote node must be specially configured to query the alarms. The source alarms will not appear unless the AlarmViewer control's alarm query is configured.
This type of query only works for InTouch HMI as an alarm provider running in a Terminal Services session, not for InTouch HMI running in a console session.
To configure the AlarmViewer's alarm query
- After starting InTouch WindowViewer (alarm provider) on the Windows Vista, Windows 7, and Windows Server 2008 R2 node, open the SMC Logger and look for the most recent string generated by AlarmMgr. For example: "Registering AlarmMgr with SLSSVC as AlarmMgr 253.127.148.120". The indicated IP address will be unique to your alarm-providing node. Note the IP address.
- In the Alarm Query tab of the AlarmViewer control on the remote computer, configure the alarm query as follows, substituting your nodename of the alarm providing InTouch HMI for "nodeabc" below and substituting your IP address noted in the previous step:
where nodename is the name of the node that is providing the InTouch alarm and ip_address is the IP address that you determined in step 1.
- Test to validate that the alarms generated from the alarm-providing node are shown accurately in the AlarmViewer control.
Wonderware InTouch HMI and Alarm DB Logger
In earlier releases that supported Windows Vista, Windows 7, or Windows Server 2008, the Alarm DB Logger could not be enabled to run as a service. The Alarm DB Logger now runs as a Service in Windows Vista and later operating systems primarily to support Galaxy Alarms and InTouch HMI Alarms from Terminal sessions. However, there is a limitation in that the combination of Alarm DB Logger configured as a service and InTouch HMI running locally as a console application is still not supported. If InTouch HMI needs to run in the Console session, the Alarm DB Logger must be configured in the Alarm DB Logger Manager as a "Normal Application" instead of a "Windows Service".
Also, if you are running the Alarm DB Logger as a console application, you cannot run it in the Terminal session until you close the one that is running in as a console application.
Refer to the updated Tech Note 725, "Running InTouch HMI and AlarmDBLogger Services on Vista and Later Operating Systems," for full details of the supported scenarios and applicable alarm query syntax.
Terminal Services Behavior in Windows Server 2008 Operating Systems
In a change from Windows Server 2003, Windows Server 2008 no longer supports the /console switch as a means of starting the remote desktop (RDP) client, also known as Session 0 or Terminal Server Console session. In Windows Server 2008, Session 0 is no longer an interactive session, and is reserved only for Windows services. Windows Server 2008 treats all remote connections as remote RDP sessions regardless of /console, /admin, or any other switches used to make the connection.
This impacts InTouch HMI functionality such as Alarm Manager that depends on the Terminal Server Console session.
In another aspect of Terminal Services behavior, InTouch HMI functions such as TSEGetClientID() can return a null value when running on Windows 2008 SP2 and Windows 2008 R2 operating systems with InTouch running in a remote desktop (RDP) client session. The cause of this behavior is that the relevant roles are not installed on the Terminal Server. You must install the "Terminal Server" role for Windows 2008 SP2 or the "Remote Desktop Host" role for Windows 2008 R2 in order for TSEGetClientId() and other related functions to work properly.
The impact to Wonderware Application Server is minimal as most Wonderware Application Server processes run as services. One impact to Wonderware Application Server is to carry forward the restriction introduced with the Windows Vista operating system which permits only one alarm provider. While both Wonderware Application Server and InTouch HMI can be configured as alarm providers, only one alarm provider can be configured at any one time.
Wonderware Application Server and InTouch HMI detect when the application is running in the console. In Windows Server 2008 R2 it implies that the application was started by a user physically at the machine. However, this behavior requires that you disable Fast User Switching in both Windows 7 and Windows Server 2008 operating systems.
When running Windows Server 2008, you must modify the terminal services behavior for the Wonderware software to operate properly.
Wonderware software detects when an application is running in the console . Windows Server 2008 treats all remote connections as a remote RDP session regardless of /console or /admin switches in the mstsc connection.
To disable fast user switching through the Group Policy interface
- Click Start and then Run. The Run dialog box appears.
- Enter gpedit.msc and click OK. The Group Policy dialog box appears.
- Go to the following location: Local Computer Policy > Administrative Templates > System > Logon.
- Set Hide Entry Points for Fast User Switching to Enabled. Enabling this policy hides the Switch User option in the Logon interface, the Start menu, and the Task Manager.
- On the File menu, click Exit to close the Group Policy dialog box.
By enabling the policy, Administrators hide the Switch User button in Windows logon, in the Start menu, and in the Task Manager.
Certain editions of Windows Vista do not have the Group Policy editor. So, alternatively, you can configure the Switch User settings through the registry.
To disable fast user switching through the Registry Editor
- Click Start and then Run. The Run dialog box appears.
- Enter regedit.exe and click OK. The Registry Editor dialog box appears.
- Go to the following location: HKEY_LOCAL_MACHINE > SOFTWARE > Policies > Microsoft > Windows > CurrentVersion > Policies > System.
- Right-click and select DWORD (32-bit) Value. Name it HideFastUserSwitching.
- Set the HideFastUserSwitching data value to 1.
- On the File menu, click Exit to close the Registry Editor.
In a Terminal Server environment that has a managed application deployed to it, the following behavior applies to references in the InTouch HMI application to the InTouchViewApp object:
ArchestrA Symbols referencing InTouchViewApp_001.Tag1:
Running on the Console - Refers to the tag value of the application running on the console.
Running in a Session - Refers to the tag value of the application running on the console.
Restarting the Window Viewer application running on the console causes references from the terminal session to disconnect and then reconnect.
InTouch Graphic referencing Tag1:
Running on the Console - Refers to the tag value of the application running on the console.
Running in a Session - Refers to the tag value of the application running in the session.
ArchestrA Graphic referencing InTouch:Tag1:
Running on the Console - Refers to the tag value of the application running on the console.
Running in a Session - Refers to the tag value of the application running in the session.
InTouch Graphic referencing Galaxy:InTouchViewApp_001.Tag1:
Running on the Console - Refers to the tag value of the application running on the console.
Running in a Session - Refers to the tag value of the application running on the console.
WonderwareInTouch HMI 2012 R2 (v10.6) Operating System Notes
The following table lists details the supported operating systems that can be installed on computers that run InTouch HMI server and client components.
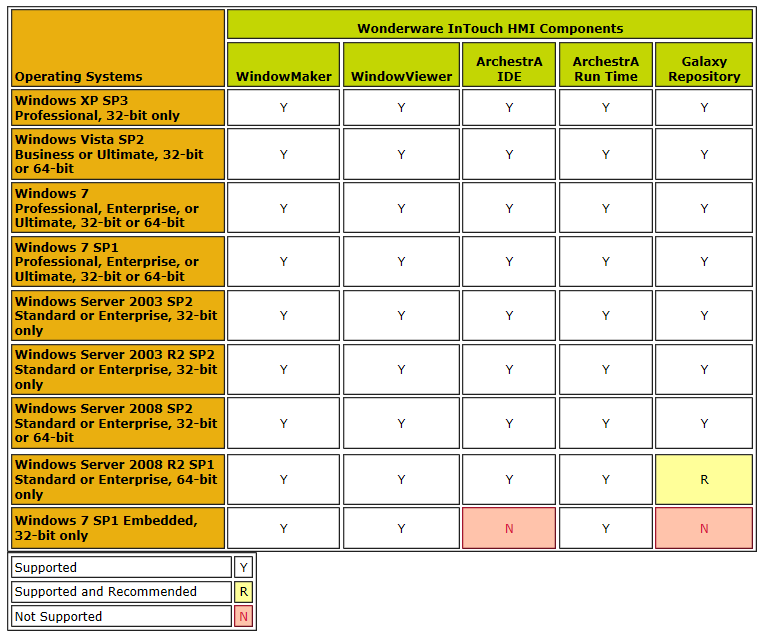
Notes:
- The recommended operating system for a Galaxy Repository is Windows Server 2008 R2 SP1.
- Microsoft Windows 7 (32-bit or 64-bit) is the recommended operating system to run InTouch HMI client components.
- Microsoft Windows Server 2008 R2 is the recommended operating system to run InTouch HMI server components.
- The recommended operating system for InTouch HMI development is Windows Server 2008 R2 SP1 or Windows 7 SP1.
- The recommended operating system for run-time nodes is Windows 7 SP1.
- Window 7 SP1 Embedded is supported on compact systems only.
Wonderware InTouch HMI 2012 R2 (v10.6) with Windows Vista, Windows 7, and Windows Server 2008 R2
- Windows Vista does not support a dedicated single-node server configuration that runs one or more databases for an Wonderware InTouch HMI system.
- If a computer runs Windows Vista as part of an InTouch HMI system, it cannot be configured to be both an InTouch HMI and ArchestrA alarm provider. The computer running Windows Vista can be either an InTouch HMI or an ArchestrA alarm provider, but not both simultaneously.
- Wonderware InTouch HMI 10.6 does not support the following functions on these operating systems: WWPoke(), WWExecute(), WWRequest(), ActivateApp() and SendKeys().
- If Recipe Manager is started using the path Start\Program\Wonderware\InTouch\Recipe, then select Run as Administrator on Windows Vista or later operating systems.
- The InTouch Extensibility Toolkit might need to be started by right-clicking and selecting Run As Administrator on Windows Vista or later operating systems to function properly.
- The onscreen keyboard options have changed for the Windows 7 and Windows Server 2008 R2 operating systems.
- Hovering to select from the Windows keyboard does not work in the Windows 7 Professional and Windows Server 2008 R2 Standard operating systems.
Wonderware InTouch HMI 2012 R2 (v10.6) View Applications and DDE Support
Windows Vista and Windows Server 2008 do not support NetDDE for InTouchView applications.
By design, an InTouchView application does not serve data to any other source, including InTouch HMI itself. When WindowViewer starts, it verifies if the application is an InTouchView application. When WindowViewer detects an InTouchView application, it does not register to become a DDE server. ArchestrA Symbols make use of the client layer when accessing InTouch tags, and appear as a third-party client trying to access WindowViewer as a data server. As a result, ArchestrA Symbols cannot communicate with InTouch tags when used with an InTouchView license.
Windows Server 2003 and Windows XP Pro still support NetDDE.
In ArchestrA Symbols, InTouch:‹tagname› is still a valid method of referring to an InTouch tag on a local node.
Wonderware InTouch HMI 2012 R2 (v10.6) Support for Windows User Account Control
ArchestrA System Platform 2012 R2 with InTouch HMI v10.6 supports User Account Control-enabled operations on run-time nodes. You must disable User Account Control (UAC) before installing ArchestrA System Platform 2012 R2 and before performing Configurator operations. UAC also must be disabled on IDE and GR nodes.
.NET Framework Requirements and Compatibility
IMPORTANT: We strongly recommended that prior to upgrading your existing applications to ArchestrA System Platform 2012 R2, that you back up your applications, become familiar with the changes introduced by Microsoft in .NET 4.0, and that you review your .NET scripts and .NET controls for any required changes. We also recommend you test the upgrade in a staging system prior to upgrading your production system.
ArchestrA System Platform 2012 R2 leverages Microsoft .NET Framework 4.0. The ArchestrA System Platform installation program will install .NET 4.0 if it is not already present in your system. If .NET 3.5 is your current .NET version, note that it is possible for .NET 4.0 and .NET 3.5 to coexist in the same machine. In this scenario, ASP 2012 R2 will use .NET 4.0. Other applications you may have on the same machine with dependencies on .NET 3.5 will access .NET 3.5.
Although .NET Framework 4.0 is highly compatible with applications that are built with earlier .NET Framework versions, Microsoft has introduced changes in .NET 4 to improve security, standards compliance, correctness, reliability, and performance that may require changes to .NET scripts you may have created with ArchestrA System Platform 2012 and earlier versions of Application Server, InTouch HMI, the Historian, Historian Client, and Wonderware Information Server. These changes may also affect .NET controls developed with .NET 3.5.
Virtualization Support
ArchestrA System Platform 2012 R2 supports the following virtualization environments:
- Microsoft Hyper-V: based on the supported operating system version
- VMware 5.0: basic virtualization without High Availability and Disaster Recovery
- VMware VSphere 5
SQL Server Requirements for All Wonderware Components
The following table details the SQL Server requirements for ArchestrA System Platform 2012 R2 components. The recommended environment is a 64-bit operating system and SQL Server 2008 R2 SP1, Standard, Enterprise, 32/64-bit.
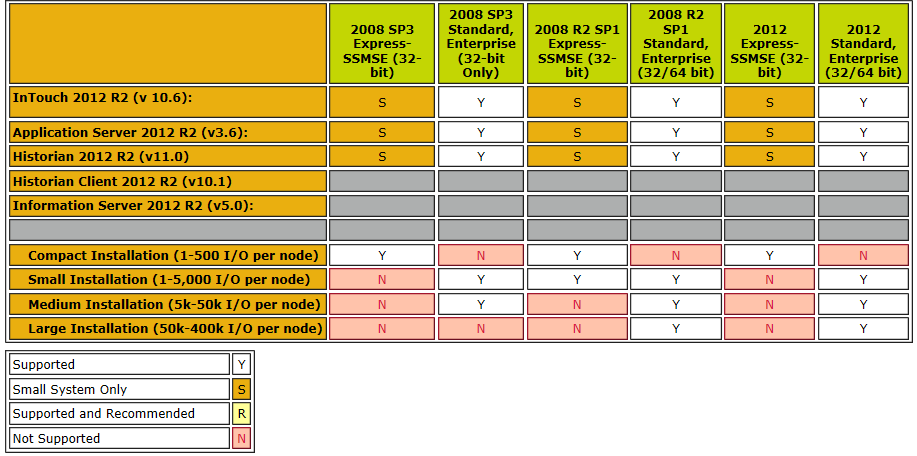
SQL Server Notes Common to All Wonderware Products
SQL Server Rights Requirements
SQL Server 2008 does not automatically create the BUILTIN\Administrators role delivered in SQL Server 2005. Because of this change to SQL Server, the Wonderware Application Server 2012 R2 (v3.6) installation process will create the necessary operating system user group (aaAdministrators) as well as the necessary SQL Server role. This automated process will provide the rights required to allow operations within the Galaxy Repository without the need for blanket BUILTIN\Administrator rights. The aaAdministrators group must be present and enabled. If you accidentally delete the aaAdministrators group from the Windows operating system, you can run either of two options to restore it:
- Run the Change Network Utility from the Windows Start menu.
- Run the aaConfig SQL Utility from the Windows Start menu.
If you accidentally delete the aaAdministrators group from the SQL Server security logins, you must run the aaConfig SQL Utility to restore it. Refer to the Wonderware Application Server User's Guide, About ArchestrA User Accounts, for further information and procedures about restoring the aaAdministrators group.
Alarm Client and Trend Client Prerequisites
The Trend Client is compatible with the following Wonderware products:
- Wonderware InTouch HMI 10.1, 10.1 SP2, 10.2, 10.5, and 10.6
- Wonderware Application Server 3.1, 3.1 SP1, 3.2, 3.5, and 3.6
- Wonderware Historian 9.0 and 10.0
- ActiveFactory 9.2 and Wonderware Historian Client 10.0 SP1 and SP2
- QI Analyst 8.1
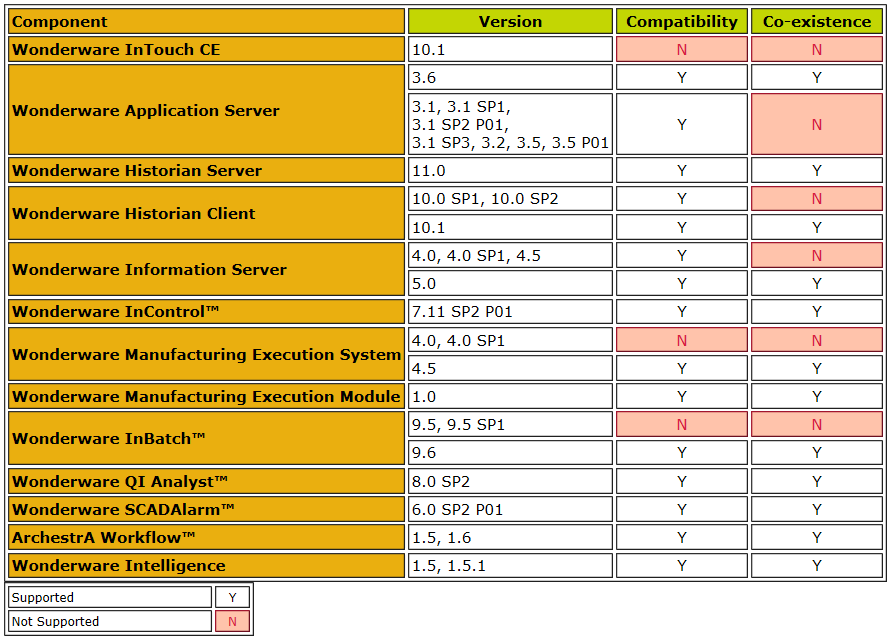
Wonderware InTouchHMI 2012 R2 (v10.6) Component Compatibility
In a single-node environment, if you need to combine multiple components delivered within ArchestrA System Platform 2012 R2, all the components need to be the version delivered in ArchestrA System Platform 2012 R2.
In a node-to-node environment, components are compatible between the current licensed version and one licensed version back.
The following table details the Wonderware component products and their compatibilit with InTouch HMI 2012 R2 (v10.6).
Detailed Steps
Performing the InTouch HMI Installation
Before you start installing InTouch HMI, you should have a clear idea whether you want to develop, deploy, and publish your own applications, or require only the InTouch run time, to run applications already created and deployed.
The following procedure will guide you through the installation, with information specific to the InTouch HMI.
To install the InTouch HMI
- Insert the installation DVD into the computer’s DVD drive.
- Using Windows Explorer, manually start the installation by double-clicking setup.exe on the DVD.
- Follow the prompts to commence the installation and to install system prerequisites, as necessary.
- The installation program prompts you to select an installation type: either product-based selection or installation by computer roles. As you are installing a single product—InTouch HMI—click the product-based selection as your installation type.
- Choose the components you want to install.
- If you choose InTouch Run Time Only, the following will be installed:
- InTouch Run Time
- InTouch documentation
- Alarm DB Logger
- FS Gateway (as a silent installation)
- Application Server Bootstrap
- InTouch Supplemental Components: InTouch Recipe Manager, InTouch SQL Access, and Symbol Factory
- If you choose InTouch Development and Run Time, the following will be installed:
- All items listed under step a in these instructions.
- Application Server Bootstrap, IDE, Galaxy Repository, SQL Server 2008 Express with SSMSE, and Application Server documentation
- InTouch sample applications
- If you choose InTouch Run Time Only, the following will be installed:
- When the installation prompts you to verify your selection, you have the opportunity to customize your installation.
- If you choose InTouch Run Time Only, the following will be installed:
- InTouch sample applications
- Additional InTouch Supplemental Components: InTouch SPC Pro and InTouch 16 pen trend
- If you chose InTouch Development and Run Time, you can add the following components:
- Additional InTouch Supplemental Components: InTouch SPC Pro and InTouch 16 pen trend
- If you choose InTouch Run Time Only, the following will be installed:
- After you verify and customize your selection, you are prompted to select the language you want to install. English is selected by default, but you can choose another language.
- Follow the subsequent installation steps to:
- Accept the End User License Agreement.
- Create a new ArchestrA user account, or specify an existing account.
- Install any prerequisites not yet met. The installation checks your system, lists the missing prerequisites, and installs them for you.
- The installation proceeds to completion. You must restart your system when the installation is complete.
Installing Your Wonderware Product License
Wonderware enforces the use of its products with a software license. After you install a Wonderware product, you must install a single license file, ARCHESTRA.LIC, which contains your customer information, product data, and software features. Until you apply your Wonderware license, you can run the InTouch HMI only in demonstration mode.
You use the ArchestrA License Manager to install the contents of the ARCHESTRA.LIC file to the computer where you have installed the InTouch HMI. The ArchestrA License Manager is included as a common ArchestrA component when you install the InTouch HMI.
To install your Wonderware product license
- Start the ArchestrA License Manager by doing the following:
- Ensure that the installation DVD is in your DVD drive.
- Click Start, and then Programs to show the Wonderware folder.
- Click the Wonderware folder, and then click the Common folder to show the list of common utilities.
- Click ArchestrA License Manager.
- Click File, and then Install License File. The Choose a License File to Install dialog box appears.
- Browse the installation DVD, select the ARCHESTRA.LIC file, and click Open.
- The Destination Computer for Installation dialog box appears. Type the domain and computer names.
- The ArchestrA License Manager copies the ARCHESTRA.LIC file to the C:\Program Files\Common Files\ArchestrA\License folder on the selected computer.
Now you can start creating InTouch applications. The next section explains how to manage an application from the ArchestrA IDE.
Antivirus Software Exclusions
After installing Wonderware InTouch HMI Version 10.6, configure your antivirus software to prevent archive files from being scanned. Also, antivirus software should not scan files in the following ArchestrA folders for 32-bit operating systems:
C:\Program Files\ArchestrA\
C:\Program Files\Common files\ArchestrA\
C:\Program Files\FactorySuite\ (The FactorySuite directory may not exist in newer installations)
C:\Program Files\Wonderware\
C:\InSQL\Data\
C:\Documents and Settings\All Users\Application Data\ArchestrA
C:\Historian\Data
For 64-bit operating systems, the exclusion must reflect the (x86) program files directory instead:
C:\Program Files (x86)\ArchestrA\
C:\Program Files (x86)\Common files\ArchestrA\
C:\Program Files (x86)\FactorySuite\ (The FactorySuite directory may not exist in newer installations)
C:\Program Files (x86)\Wonderware\
From Application Server Platform objects:
- History Store Forward directory: (if not default)
From Application Server Engine objects:
- Checkpoint directory location (if not default)
<InTouch Application folder path> including:
C:\Documents and Settings\All Users\Application Data\ArchestrA\
<SMCLoggerStoragefilepath>. The default is:
C:\Documents and Settings\All Users\Application Data\ArchestrA\LogFiles\
SQL Server database files of type:
- .mdf
- .ldf
Note:
Ensure that the subfolders of the listed directories are also excluded. Specify folder names accordingly if you are using a 64-bit operating system. For example, the program file's root directory in a 64-bit operating system is C:\Program Files (x86)\... and the application data root directory in a 32-bit operating system is C:\ProgramData\...
Modifying, Repairing, or Removing the InTouch HMI
To modify, repair, or remove an installation
- Insert the installation DVD into the computer’s DVD drive.
- Click the Add or Remove Programs option in Windows Control Panel. (In Windows Server 2008 R2, this is called Uninstall or Change a Program.) The list of software installed on your computer appears.
- Select the InTouch component, and then click the Uninstall/Change button. The Modify, Repair or Remove Installation dialog box appears.
- Follow the prompts to modify, repair, or remove the installation.
Note: The name of the Uninstall/Change button varies depending on the Windows operating system installed on your computer.
Upgrading to Version 10.6 from an Earlier Version of the InTouch HMI
After the hardware and software requirements are met, including the proper operating system, SQL server and other prerequisites, you can upgrade to Wonderware InTouch HMI version 10.6 from the following versions of the InTouch HMI:
- Version 10.0 SP2
- Version 10.1 (All service packs and patches)
- 10.1
- 10.1 SP2
- 10.1 SP2 P01
- 10.1 SP3
- 10.1 SP3 P01
- 10.2
- 10.5
- 10.5 P01
You can only upgrade ArchestrA System Platform products that are already installed and you will not be able to install new products within the ArchestrA System Platform that have an upgrade process. The installed components that need to be upgraded are selected and disabled. You can neither clear these check boxes nor select more components during the upgrade.
To upgrade from a previous version of the InTouch HMI
- Insert the DVD into your DVD-ROM drive. Run setup.exe to start the set-up program.
The upgrade feature dialog box appears. - Follow the prompts to complete the upgrade.
Migrating Applications to WonderwareInTouchHMI Version 10.6
You can migrate applications from the following earlier versions of InTouch HMI to version 10.6:
- Version 7.11 P07
- Version 8.0 SP2 P04
- Version 9.0 P03
- Version 9.5 SP1
- Version 10.0 SP2
- Version 10.1 (All service packs and patches)
- 10.1
- 10.1 SP2
- 10.1 SP2 P01
- 10.1 SP3
- 10.1 SP3 P01
- Version 10.2
- Version 10.5
- Version 10.5 P01
Licensing
Please click HERE for details on licensing.
Validation of Solution
Text...